Showing posts with label born pretty. Show all posts

Wednesday, February 18, 2015

Born Pretty Stamping Plate Review


Hi there everyone!!!!
Today I will be sharing 2 new Born Pretty Store stamping plates. In recent months Born Pretty have jumped on the band wagon and produced lots of new stamping plates and designs. Some kind of look like everyone elses and others are really unique. I brought a bunch of the rectangle plates and circle ones. The regular circle ones are pretty much the same as what they have sold before, but the new backed rectangle ones are very impressive,


I found that for the price of $5.09 each (tho I did get them on special for $3.99) these were really good value for money. The image sizes are approx 2cm x 1.5cm which will fit most nails. They are really deeply etched and I could pick up the stamping polish very easy with all of my stampers. The fact the have the plastic backing is great so there is no chance of cutting yourself on the sharp edge.

I picked a image for both plates and created this manicure using Nail Stamping Queen black stamping polish and a Celestial Cosmetics polish.


As you can see they stamp really well!!!!

You can purchase these plates from Born Pretty Store  for $5.09 each but if you use the code CATG10 you will get 10% off your whole order.

Until next time......
post signature

Sunday, February 1, 2015

Introduction To Nail Stamping.


Hi there everyone!!!!

So as today is day one for Stamp-a-Palooza, I thought that I would post the basics of Nail stamping and How I started.

Then first time I stamped was over 2 years ago. There was not many brands out there who had product and there was no one who was even making nail stamping polish!! So I used a $2 bottle of Ulta3, a old store card and a cheap 99 cent basic stamper. There were no creative stampers or sticky stampers about just a plain rubber stamper. 
We look at the market now in 2015, and there are many nail stamping polish brands available, a mass of different branded plates and every tool you can think of to use in stamping!
But where do you start? How much will you need to spend? Who has the best deals and plates, tools and polish??
Hopefully I will be able to help you decide what to purchase over the next month.

Today I have a video to share with you. Don't laugh... it is my first attempt so hopefully they will get better over the month. :D 

So the basic products I used in this video are below.  They are exactly what I used when I started
stamping.
* A standard plate from Born Pretty Store which set me back 99 cents
* A standard rubber stamper from Born Pretty Store that cost me at the time 99 cents. (they are about $2.99 now) 
*An old store card. 
*The polish is Ulta3 black satin, and even now this is still one of the best black polishes to stamp with!


You will also need the following basic extras- 
* Nail polish remover
* Lint free wipes
* Fast dry top coat
* Masking tape

Check out the video below!


I hope this video helps you all to stamp your first design!
I will be doing more tutorials over the next month so do not forget to subscribe to my channel and Loki's Lacquer on the left sidebar so you can get emails on each tutorials.

Also during the month if you have any questions at all be sure to pop them in the comments and I will try to accommodate for you :)

Tomorrow I will be sharing a review on Mundo de Unas stamping polishes.

So until tomorrow.....

post signature

Wednesday, October 15, 2014

Stamping with born pretty stamping plate M98


Hi there everyone!
Today I have a stamping plate to share with you from born pretty. I was lucky enough to have a few born pretty items sent to me for review. I was sent plate M98 to have a play with.
I found the plate to have good size stamping images on it and when I places my polish to scrape off the image came up clean and clear on the stamping pad. I stamped each image on my nails for you all to get an idea of the image quality.


There were a few little breaks in the image pattern but i find that sometimes even the best plates can do this. 
The plate retails for USD$2.99 over at Born Pretty and the shipping is free world wide. Plus if you use the code CATG10 you will get a further 10% off.

Until next time........
post signature

Friday, August 8, 2014

Nail art with gold leaf.


Hi there everyone! Today I have some cool gold and silver leaf to share with you.
I recently received from Born Pretty Store some little jars of gold and silver leaf. in the pack were a jar of silver and a jar of gold. the size was quite big and I think you could pretty much cover all 10 nails with one jar. here is what the leaf looked like.


I tried to unfold the gold leaf a best as I could to give you an idea of how big the pieces are. Each piece was approx 3 inches square which is a great size for the small price they are.
I decided to do a rough weathered look on my nails with both colours,so I painted my nails with OPI my dogsled is hybrid from the new Nordic Collection (2 coats +top coat) and then with some regular top coat.....NOT quick drying........I randomly popped rough streaks of polish over my nail. Then laid the gold foils over once the polish was tacky. Using a old paint brush (I used an old concealer brush) i pushed the gold leaf on and brushed away any unwanted leaf from my cuticles etc. I did each nail separately. Then once all the gold was randomly on my nails I went back and did the same with silver leaf.
Lastly I poped over a coat of Picture Polish Revolution. I used this particular polish which is actually a base coat polish because it is one of the very few polishes that will not wrinkle your foils/gold leaf. Once the revolution was dry I then popped over my normal top coat.

Here are the results.

sun

shade

 The all over effect I really liked and it was very quick when you go the hang of the leaf and how delicate it is.

You can pick up the gold and silver leaf for only $2.29 over at Born Pretty Store and if you use the code CATG10 you will get a further 10% off and free postage worldwide.
If you like the new OPI colour My dogsled is hybrid head on over to David Jones where the new Nordic collection are Exclusive.

Until next time......

post signature
*products provided for review. For more information check out my disclosure policy. 

Tuesday, August 5, 2014

Born Pretty Gem Review


Hi there Everyone!, it has been a week since my last post. I have been very slack, but kids have been still crook so today is the first chance I finally got to pop a post up! Fingers crossed no more sicky kids!!!!

I have to share with you today some lovely nail gems I received from the Born Pretty Store.
They came in a pack with 4 different size gems and all of them had a almost two tone shift on them.
I used several sizes to create the nail art on the featured nail. The other nails I used 3 different sized gems. They were easy to place. I just added them while my top coat was still tacky then placed another top coat over the gems. I used MckFresh Nail Attire Heart for my polish.


The gems can be found HERE and are $4.47 for the pack. If you the code CATG10 you will receive 10% off your order. Plus there is free world wide postage.

Until next time......
post signature
*products provided for review. For more information check out my disclosure policy. 

Monday, May 26, 2014

Aussie Nails Monday- Disney Theme


Hi there everyone!
Today is Aussie Nails Monday, and the theme is Disney. My daughter Zoe was excited about this theme and wanted me to do the movie Frozen. Personally I have not seen it,but both my girls watch it over and over and over......... you get the drift.....so I know most of the songs! 
I was going to do the snowman Olaf, but a few other girls in Aussie Nails monday were doing him so I decided to do Elsa. She is the blonde one in the movie thats sings Let it Go.....see you can see I have no clue about the movie!! ill have to watch it at some point I'm sure!!!


So I hunted for some inspiration and found a pic I liked.


Then took my inspiration from that.
I used Picture Polish for the mani apart from one OPI called desperately seeking sequins, from the new Spotlight on Glitter Collection.


After messing about with a LOT of sponges and making my gradient, then stamping snowflakes using QA58 plate from the born Pretty store, I finally finished my mani. Then an added bonus was cause I used Picture Polish Instinct it now was UV reactive!!!!


Im super happy how it turned out! and even tho I wanted to do monster inc on my nails Zoe loves these so a winner all round!!!

You can pick up the Picture polishes I used HERE and the OPI polish from MYER. the stamping plate is from Born Pretty Store and make sure you use the code CATG10 for 10% off your order :)

Make sure you check out everyone else disney manis too!!!

Astrid - @lovessweetas
Briana - @briemmara
Christinemay - @xtinemayyy or Nails at 2am http://nailsat2am.blogspot.com/
Elissa -@tenlittlenubs and Ten Little Nubs http://tenlittlenubs.blogspot.com/
Erin Wu -  @erinzi and Erin Zi’s Nails http://www.erinzi.com/
Holly - @nails_by_holly
Jennifer @jennlojko
Julia - Fancy Nails and Cups of Tea http://fancynailsandcupsoftea.blogspot.com/
Kate - Pimped Out Nails http://pimpedoutnails.blogspot.com/
Kelly - @kellyskolors and Kelly's Kolors! http://www.kellyskolors.com/
Lily Jinks - @lilyandjinks
Loz - Polish Patterns http://polishpatterns.blogspot.com/
Tracy - @oliviajade19
Naomi - @nadeekay and Nananaisnails http://nananaisnails.blogspot.com/
Nicki - @celestialcosmetics
Relle - @lazylacquerista or Lazy Lacquerista http://www.lazylacquerista.com/
Sarah Claire - @shattermeclaire or Shatter me Claire http://shattermeclaire.blogspot.com/
Sylvie - @smudgedpolish
Tammy - @ohmygoshpolish
Tammy G -@lightlylacquered and Lightly Lacquered www.lightlylacquered.com
Tash Birch - @tashisdead
Theresa - @itsallaboutpolish or It's All About the Polish http://www.itsallaboutthepolish.com


Until next time........
post signature

Monday, December 9, 2013

Aussie Nails Monday - Snow and Snowmen


Hi there everyone!
Another Aussie Nails Monday today and this week its all about Snow and Snowmen!
I chose to do a couple of designs and different polishes that give that snow effect!
So on with the Snow Show!!!!!

Dead Set Babes- Don't you know jack(frost) over navy blue polish

Silver snowflakes from BMH02 plate over Joss in a mermaids Dream

a snowflake custom polish over Orly Acid rain

Kiko metallic blue then born pretty stamping plate for the snowflakes, topped with nail art using
Zoya elissa/chyna,Ulta3 black satin/lily white, OPI callme gwen ever/pink friday/what wizardry is this?

I have a bunch of fun doing snow nails, and i cannot wait for next week too!!!!

Until next time..........
post signature

Sunday, October 6, 2013

Born Pretty Nail Foils review


Hey there  everyone! today i have another product to share with you from the Born Pretty Store.
They were kind enough to send me a pack of nail foils to have a go with, and review.

Ok so here it is straight up...... apart from using foils on cards for crafting i have NEVER used foils before! but i really wanted to have a go at them :) so  please don't judge my not so prefect end result.  I have seen a lot of ladies use foils and get an awesome result.

OK so first up the foils came in a little plastic container. Great for storage and easy to see the design.


I picked as you can see a clear holo pattern so i could put it over any colour and get a holo result. i thought i would go simple for my first go! you can find this foil HERE it is number #26.

so first up my advice is if you are new to nail foils....don't pick a light see through colour! i took the foil out and was totally confused which side was which as it is not obvious as you would think. i have since see the opaque coloured ones and one side is silver so you know which is which! 
Anyways once you figure out which is the correct side to place on your nails, cut yourself enough little pieces for foil to place on every nail. By doing this you do not waste the foil .

Ok next thing, the instructions said not to use any kind of foil adhesive they say to just use the polish your wearing. but i just could not get it to work that way. so i used my jessica holo aqua base which seemed to do the trick. it went a little tacky and the foils stuck no problems :) i also tried a top coat as well and that worked as well.


once your nails are painted the desired colour doing one nail at a time paint with your aqua base/top coat, wait till it gets tacky then place the piece of nail foil on top.


Rub it on your nail getting into the edges and then lift off.
Repeat with all your other nails.
Once you have finished seal with either a top coat or Picture Polish revolution. Revolution is a glitter base coat but it works really well as a top coat for foils and stops them wrinkling when you put it on. you can purchase revolution HERE.

and now for the finished effect. mine were not the best foil job, but for my first go it was not too bad. they sparkled heaps and it was a ice change from a normal holo polish.


If you would like to give this technique a go you can get the nail foils from Born Pretty Store for only a few dollars. there is free worldwide shipping and if you use the below code you will get 10% off!!!


happy foiling


Wednesday, September 4, 2013

Colour change polish from born pretty store. Review.

Hey there everyone...i've been a little AWOL lately so sorry for that ! with all my family's birthdays coming up in the 2nd week of september....YES! all 3 birthdays within a week and then fathers day thrown in, i have been pretty slack on the blogging front.

But today i have an intriguing product to share with you.

I was sent for review a Mood colour changing polish. now color change polish is the "in thing"ATM and with everything 80's seeming to be the trendy thing, i thought id jump on the band wagon and give this a go.


I'll be honest, when i got the polish, the first thing i did, which i always do was to pop it onto a swatch wheel. I opened the polish and it was all gloopy :( BLAGH! but after a good shake it seemed to mix together.
I swatched it on the wheel and after 30 mins the polish still had not dried. the first thing i thought was i got a dud bottle of polish. but i left the polish for a few days and then decided to go back to it and swatch on my nails.
The polish again had gone gloopy in the bottle so i shaked ti again and it all mixed in. you can actually see in the bottle shot above how the 2 colours are mixed together.
I swatched over my base coat of duri, and once the first coat had gone on, it took approx 10 mins to fully dry, which again i thought was a little odd. but i did the 2nd coat and then after another 10 mins i put on a top coat of seche vite.

Here is the polish on my nails and when the polish is hot..or body temp.

 
It is the most beautiful blue colour!!!! so at this point i was forgiving the horrible formula.

and here it is cold. *please note that the polish gets a lot more purple,but even after putting my hands in cold water,the weather was warm so the polish changed back pretty quick! 


So i was totally loving the colour change, i kept on sticking my hands over the air conditioning in the car so it would keep changing!!! 

but what of the formula??? 

Well i contacted Born Pretty Store prior to posting this review as i did not want to write a negative review before learning what the issue was with this polish, and as i said before the colour is "to die for"so i needed to get all the facts.

Anyways, it turns out that this polish is a water based polish!!!! YES!!!! who would have known?? no where on the product listing or on the box did i see it written that these polishes were water based!
Im actually excited over this discovery because as a parent of 2 girls who want their nails a different colour EVERY day, i can let them use this product knowing that i will not have to keep using nail polish remover on their delicate skin! The polish will just wash off in water!
Saying that, if you are like me and LOVE the colour of this polish, you just have to be a little more forgiving to this polish and wait the time it takes to dry and make sure you put a good top coat on. by doing this you will seal the polish and it won't wash off. and make sure you do your tips, as i did not and the polish started to wear after my first hand wash.

So all in all and now i know that the polish is water based i am more than happy with it! my girls can paint their nails as much as they like, and i can just make sure i use a top coat!

But after all this your thinking.... "way too much effort" you could always give one of their other colour change polishes a go as BPS sell colour change gel polish which is a gel UV based product.

so verdict out of 10?? id say a 5. i LOVE the colour ,not the formula, but like i said before the colour of this polish it TOTALLY worth the not-so-great formula. I will wear this again, and my kids will too!

If you are looking to buy this product, you can find it here and do not forget that it is free world wide shipping and if you use the code CATG10 you will get 10% off you entire order!!!!

until next time...


Wednesday, August 14, 2013

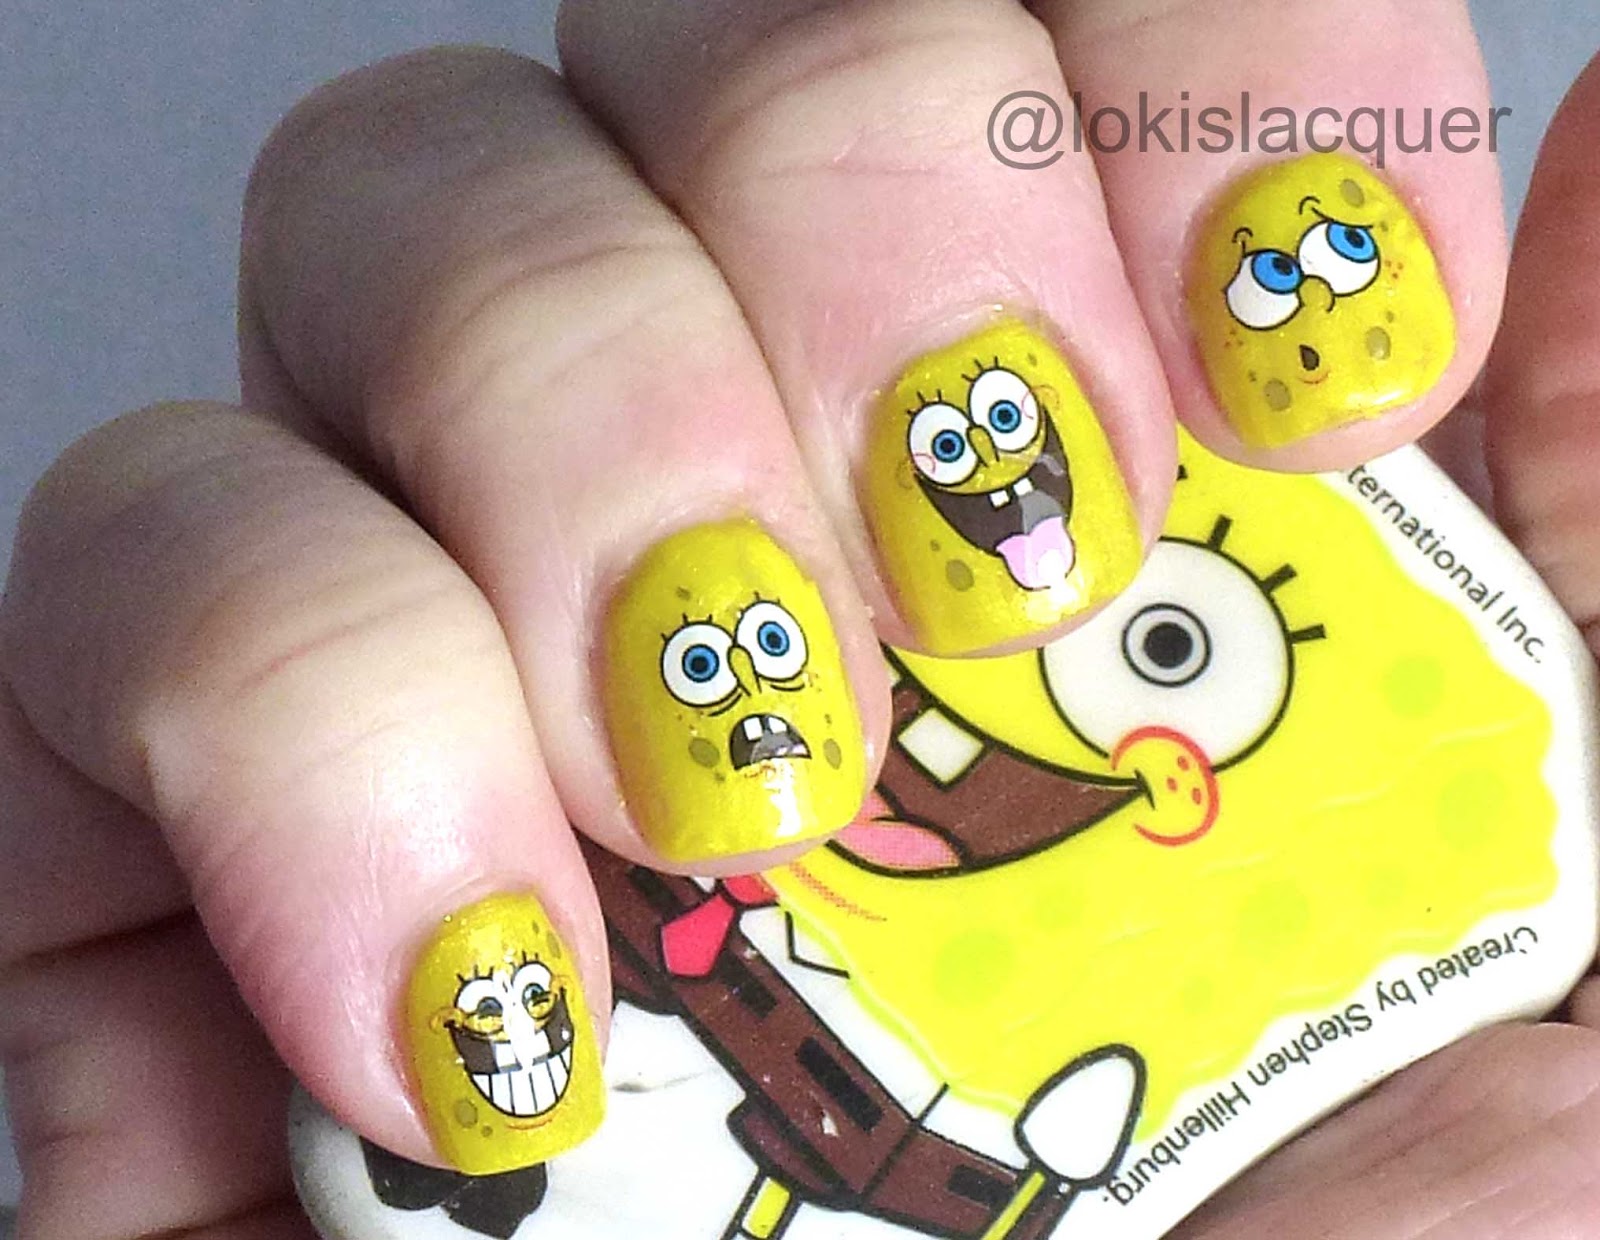
Spongebob nail decals from Born Pretty store Review


Hey there everyone!!!!
today i have a neat little product to share with you all.
Now if you are like me and are not the "best"at nail art, then this is for you!!!

Sponge bob square pants nail decals!!!! i saw these and i just had to have them for review!!! mainly cause they are Spongebob and if you know me at all i call my 2 girls when they are in trouble or up to no good "Barnicles!" so you may be asking....how do they work??? Well here is a little tutorial for you to learn how.

Ok so you will need for these particular decals - a small glass of water, some scissors, polish and a few bits of paper towel .


First things first. paint your nails to the desired colour. i then pop a quick dry top coat over my colour "just in case"i have a mishap with the decal so i can remove it easy and not ruin the polish below.


Ok so now how to use the decals; pop the decals out of the packet. you will see a clear film over them. make sure you remove this.


Next cut out the decal you would like to use on your nail. make sure you cut fairly close to the image so you do not have excess decal on your nail.


Once you have cut the decal out, place it into a glass of  lukewarm water for about 20 seconds. THen remove the decal from the water.


Now this is the tricky bit. Place the decal on your nail and gently move back and forward to release the paper from the decal. now for some reason these decals i had were upside down! yep so the back of the pic was on my nail when i lifted up the paper. but this was easy fixed by me lifting up the decal and flipping it over on to the correct side.


Once you have the decal where you want it. pat it dry and then let it sit for a few mins until totally dry and the decal does not move any more.


Then pop on a top coat and your mani is done!!!


I decided to pop spongebob on every nail!


In the pack there was spongebob faces in 3 different sizes so they fitted on every nail with ease.
Apart from the image going the wrong way these decals were simple to use and lots of fun. My daughter Zoe thought my nails were amazing when she saw them and even thought i had painted it at first!!!

You can pick them up  HERE and if you use this code CATG10 you will get a further 10% off anything at the Born Pretty Store  PLUS there is free worldwide shipping as well!!!!!
 Until next time....