Friday, December 20, 2013

Some Christmassy nails......


Hi there Everyone!!!, 
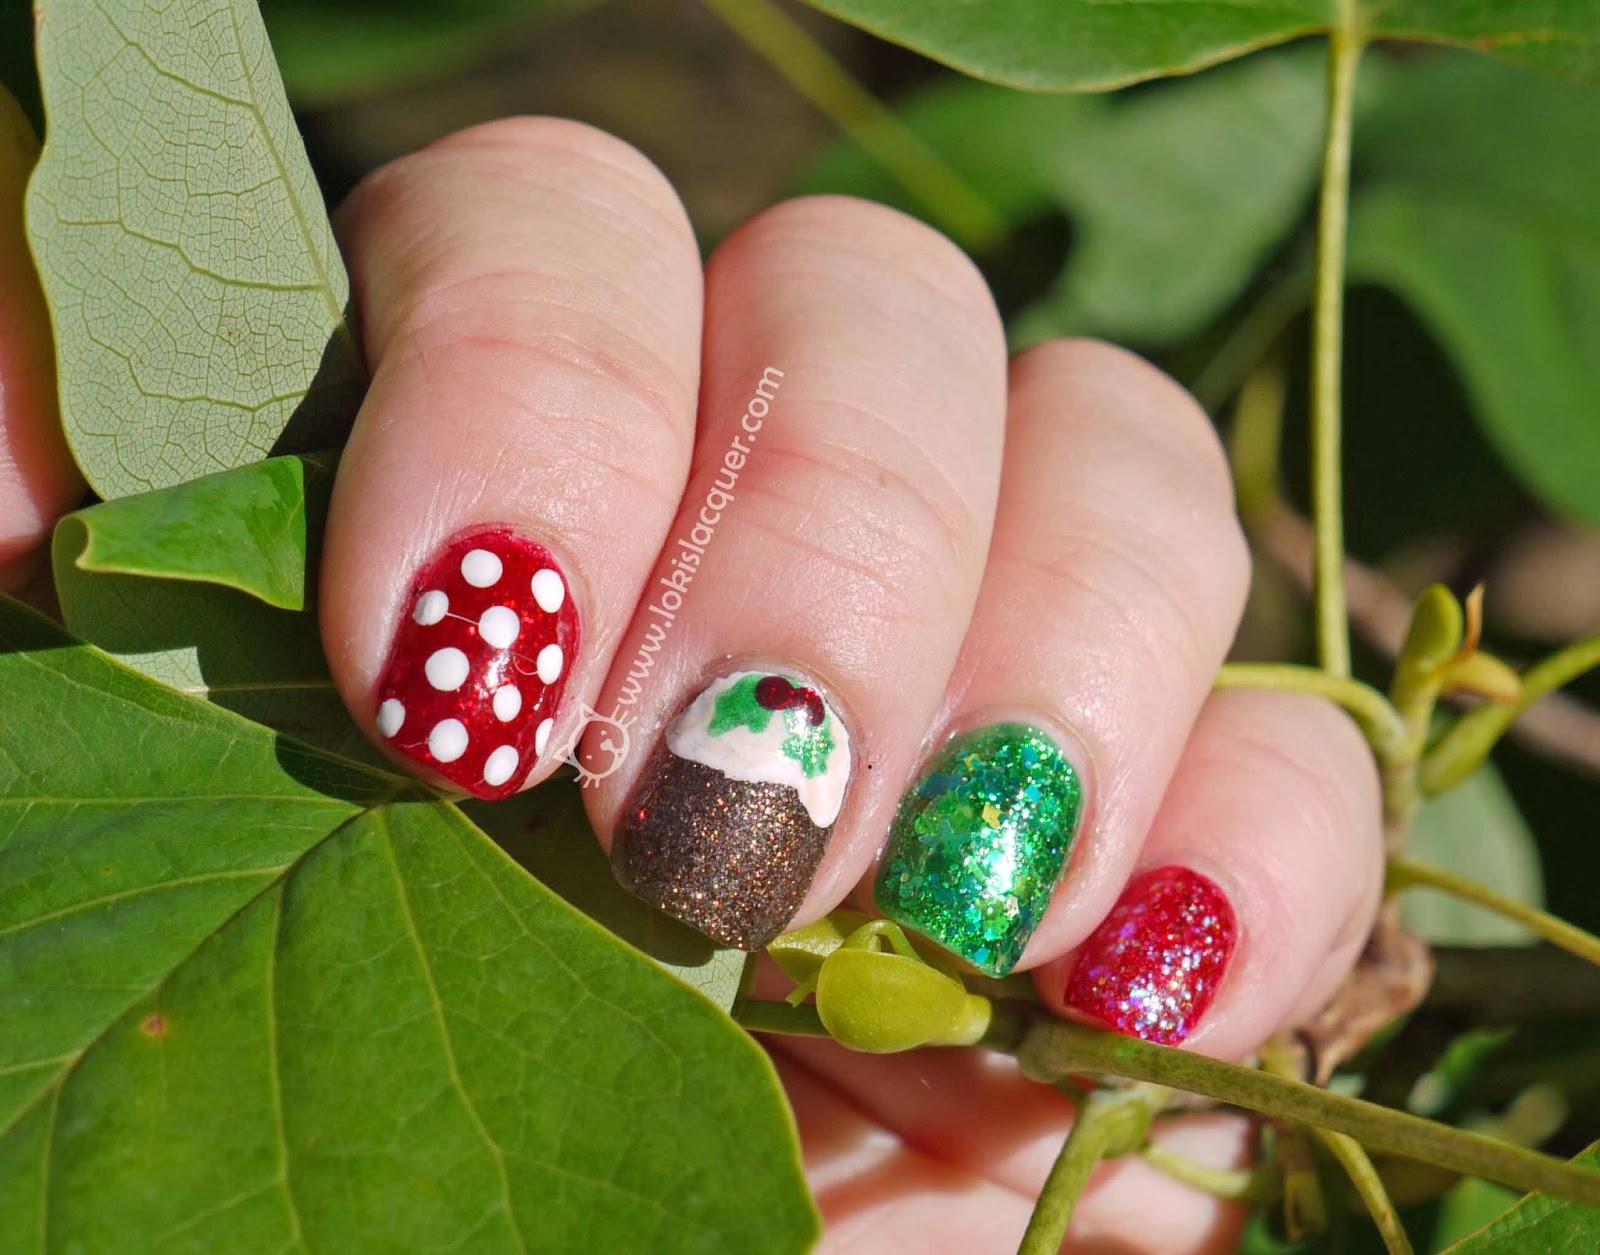
today i have some nail art to share with you. As christmas is getting closer i have been adding more and more nail art when i paint my nails. and here is a mani i did last week. 
I went the christmas pudding main, which is a classic.

My thumb is Zoya Holly topeed with Lynnderella Emerald hope

On my pointy finger i used Zoya Chyna then did dots using a dotting tool in Ulta3 Lily White.

The middle finger is OPI what wizardry is this? then ulta3 lilly white with OPI don't pretzel my buttons as shading on the white. Then i used Zoya elissa and Zoya holly for the holly and berries.

The ring finger is Zoya holly then topped with Lynnderella emerald hope. i love this polish so very much and i wish i had every polish that Lynnderella does in single colours! they are awesome!

Lastly my pinkie is Zoya elissa topped with China Glaze snowglobe.


I think the Mani turned out quite well! I had a lot of positive comments on my nails when i was sporting it.

And if you did not get enough of a christmas mani fix here, why not check out the xoxo,Jen blog she is having a Christmas mani party until new years and you too can just add your manis and join in the fun!


Until next time........
post signature

Wednesday, December 18, 2013

Ulta 3 Candy Couture Nail Art kit Review


Hey there everyone,
Today i have a great kit to share with you that is brought out by Ulta 3. As some of you may or may not know, Ulta 3 is a "chemist" brand you can find in big white bins for only $2.00 a bottle. This polish brand is for the money, I think one of the best value around. I personally own over 50 different colours from their range and as new colours come out, i'm one of the first to be hunting down every new colour.

For a little while now Ulta3 have been bringing out some different gift packs to purchase. I was lucky enough to be sent the nail art candy couture kit.


The kit contains 3 limited edition colours, 3 Limited edition nail art stripers, a mixing plate,dotting tool, sponges and some nail art stickers.

There is also a instruction booklet inside the pack that shows you 3 different techniques, which i will show you today.


First up i have to say that the kit looks great. the instruction leaflet was informative. I tested the instructions out on my 12 yr old and she understood them so for a novice at nail art im sure they would be able to follow no problems. The only issues i had with the information booklet was the nail shots were superimposed and looked really fake :( i would have likes to see real nails in the booklets. and honestly there are so many nail bloggers out there im sure one of us would do it for a few bottles of free polish :) but apart from that a great booklet.

 There are 3 Limited Edition colours in this gift pack.


Fairy Floss- This is a real girly pink. It took 3 coats to get opaque. it is a lovely colour. I used Seche Vite as a top coat.


Sour Grape- A beautiful purple colour. this was only 2 coats to be opaque and a top coat of Seche Vite.


Toffee Apple- Another awesome colour. this green is just right. but then i'm a sucker for green :) 
2 coats for opacity and a top coat of Seche Vite.


There are 3 nail art stripers in the kit. The colours are Sizzling Red, Lily White and Black satin.


So i decided to follow the instructions and create the nail art in the booklet.

First up are polka dots. I followed the instructions and used fairy floss, the lily white striper polish and used the dotting tool for the actual dots.


Next in the instruction booklet was a gradient.I picked toffee apple and sour grape.
I followed the instructions to see if i would get the same effect, tho i did put a base coat of the sour grape first to make sure it would be opaque enough on my nails. I cut the sponge in 1/2 to save some for next time and i also jiggled my sponge back and forth to spread the polish and get a better gradient.


Lastly was the zigzag lines. I used toffee apple and the lily white and black satin stripers. I again followed the instructions to start with,but i just could not get it right. i'm use to dotting my nails first so i know where the chevrons need to go so they are all even. but i persisted with the booklet and they did not turn out too bad.


I also wanted to show off all 3 colours of the nail art stripers, so i grabbed my bottle of Ulta 3 honolulu and did some nail art.


Lastly i wanted to show off the nail art stickers. They are really cute almost like graffiti. I would have loved to see them in white and black rather than 2 sheets of black. White would have been awesome on black matte nails as a chalkboard mani.

So to show off the Nail art stickers i did 2 coats of Ulta2 lily white, then 2 coats of Ulta3 citrus, I placed the nail are stickers using the small end of the dotting tool in the kit, then did 1 top coat of Seche vite.


 How cute are the stickers!!!!!!
Now I do not know if you are aware but several of the Ulta 3 polishes are UV reactive. so I took a pic under the UV light I have.


How Awesome is that!!!!!!!

This kit is great value for money and any nail enthusiast would be super stoked to get this for Christmas.

The kit RRP at AUD$20.00 and can be purchased from most chemists that stock Ulta3 nail polish.

If you cannot find one near you head on over to the Ulta 3 Facebook Page and you can message your post code to them to find you nearest stockiest.

Until next time.....
post signature

Sunday, December 15, 2013

Joss polishes- Colour Illusions collection- swatches and review.


Hello there everyone,

Today I have f 5 polishes to share from the Joss Colour Illusions Collection which were sent to me by the lovely Ray over at Beauty World Now for most you Beauty would may not be a name you know, but for us Indie polish makers we frequent Beauty World quite a bit to get an array of supplies for our polish making.
But  Beauty World not only sells glitters and polish making supplies they also sell other beauty related products as well. One of the great ranges they have is their polish collections. Joss have holographic polishes for a little as AUD$9.95 and also glitter polishes from AUD $6.95. I have 5 to share from their glitters with you today!

*please note at all colours were 2-3 coats with a Seche Vite top coat.

In a Mermaids Dream (JC783)- This is a beautiful bright blue that is packed full of holographic and iridescent glitters plus what i can only describe as a green to pink shift. It was really hard to capture the colour shift with in the blue but be assured it is their and this polish totally is a million times more holo that i could also capture!

In sun

In the sun with silver snowflakes stamped on top.


In the sun with silver snowflakes stamped on top

In the shade with silver snowflakes stamped on top.
You can just see the shift in the shade pic. Coverage was easy and the wear was great. i had this on for 3 days before removing it and all i has was a little shrinkage from the Seche Vite.

A Calming Influence (JC782)- This is a lovely lavender jammed packed with holo glitter. I really fell for this colour BIG time! i'm not a huge fan of paler colours but this was just awesome on. Only 2 coats were needed and boy did it sparkle when i went in the sun! I did note a small amount of settling with this polish but i was assured by Ray that this is totally normal with these polishes. and after a bit of a shake the polish was fine.

In sun

In sun

In sun

In sun
Amazing...right??!!

In a Violet Haze (JC780)- Is a what i could only describe as a white/silver holo glitter packed polish with a very distinct purple to green colour shift. This i think is another favorite of mine in this collection of Joss Lacquers. 3 coats were needed for full coverage. Again the pics don't do the polish justice. it was SOOOO sparkly on it was insane.

Bottle shot


In sun

In shade

And as i loved the last 2 polishes so much i decided to do a gradient mani with them.

In sun

In sun

Desert Sunset (JC779)- Is a copper/gold polish packed again full of glitter that has a gold/red shift to it. the polish is so hard to describe. and once again so very hard to capture in photos. i notices a small amount of settling in this polish also but once i had given it a little shake all was well and i applied 2 coats for full coverage. I tried to capture the different colours this polish produces as best i could with shade and sun shots.
Bottle shot


In shade
In shade

In sun (as it was starting to set)

Magic Potion (JC781)- Is a very festive green, tho im sure i will wear this at other times too. It is packed full of holo glitter again and I only needed 2 coats. I really like this colour for Christmas!

Bottle shot

In the shade

In the sun

In the shade

 For the price of AUD$6.95 these polishes are certainly worth every penny. There are over 20 different Joss lacquers to choose from on the BEAUTY WORLD website, from these glitters, to holographic polishes.
BEAUTY WORLD ship Australia wide currently, but if you love overseas you can head on over to LLarowe and she ships world wide.

Until next time.......

post signature

Notice a blog name change???

Hey there everyone!


As you may or may not have noticed Osiris and Loki paint their nails has changed to Lokis Lacquer.
nothing has changed with the content i share, i just needed to stream line everything so now if you follow me on FACEBOOK or IG they are all the same. so now when you type in www.osirisandlokipainttheirnails.blogspot.com you will be re directed to www.lokislacquer.com. I will be changing everything else hopefully over the next few weeks like twitter etc.
Thanks for your patience with all of this.


post signature

Friday, December 13, 2013

Dead Set Babes griswold christmas tree swatch and review


Hi there everyone!
I have one of the new Christmas collection polishes by DEAD SET BABES.
 Griswold family christmas tree is a mix of green bar glitters with an array of dots in all sizes and colours. The polish is in a very sheer green base.

At first i was worried i would not be able to get the dots out of the bottle. with so many dot glitter polishes the dots tend to sink. BUT NOT WITH THIS POLISH!!!! I got an ample amount in my brush to place on my nails with every dip of the polish! so i was very happy!
So on with the pics.....


bottle shot under artificial light

1 coat over a custom holo green polish


one coat over black.


matte top coat.

matte top coat.
There so many ways to wear this polish!! i only did a few but the ideas are endless.

You can pick yourself a bottle of Dead Set Babes HERE and they ship worldwide.

Until next time.....
post signature