

Hi there everyone! I have to day to share with you the Sally Hansen Salon Gel Manicure Starter Kit. As far as I am aware this kit is exclusive to Priceline.
The kit is a very straight forward process for someone who has not used Gel before and when done correctly you can get a good 2 weeks wear from a single manicure, so for work, or holidays this "gel at home" kit is well worth the money.

The kit comes in a little box with everything you need to start your gel journey. When you are at the shops you can check out what the kit looks like as Sally Hansen have cleverly put a little flap on the box so you can see exactly what you are getting. I love that you can see this as most gel kits you cant see what you are getting till you get home.

So what is in the kit?? When you buy the Sally hansen salon gel manicure kit you will receive the following.
- A LED lamp.
- Sally Hansen gel base coat
- Sally hansen gel top coat
- Sally hansen coloured gel- the kit I got had Wine not as the colour,but there are several choices.
- Orange stick- to push your cuticles
- Buffer
- acetone
- lint free wipes with a cleanser in them to clean off the sticky residue from the gels.

So how do you use this kit? I have popped together some basic instructions to help you get the best manicure possible with the Sally Hansen Gel kit. I hope this helps everyone get a good idea on how to use the kit and for those who have been a little wary about gel kits this little tutorial will help you see the process is very simple and easy to do.
When doing any gel manicure I always recommend you complete one hand first before starting the second hand. This will stop and smudges.
Step 1- Take the orange stick and push back your cuticles. This is a good practice to do regularly but when applying gels you do not want cuticles getting in the way of applying your gel polish.
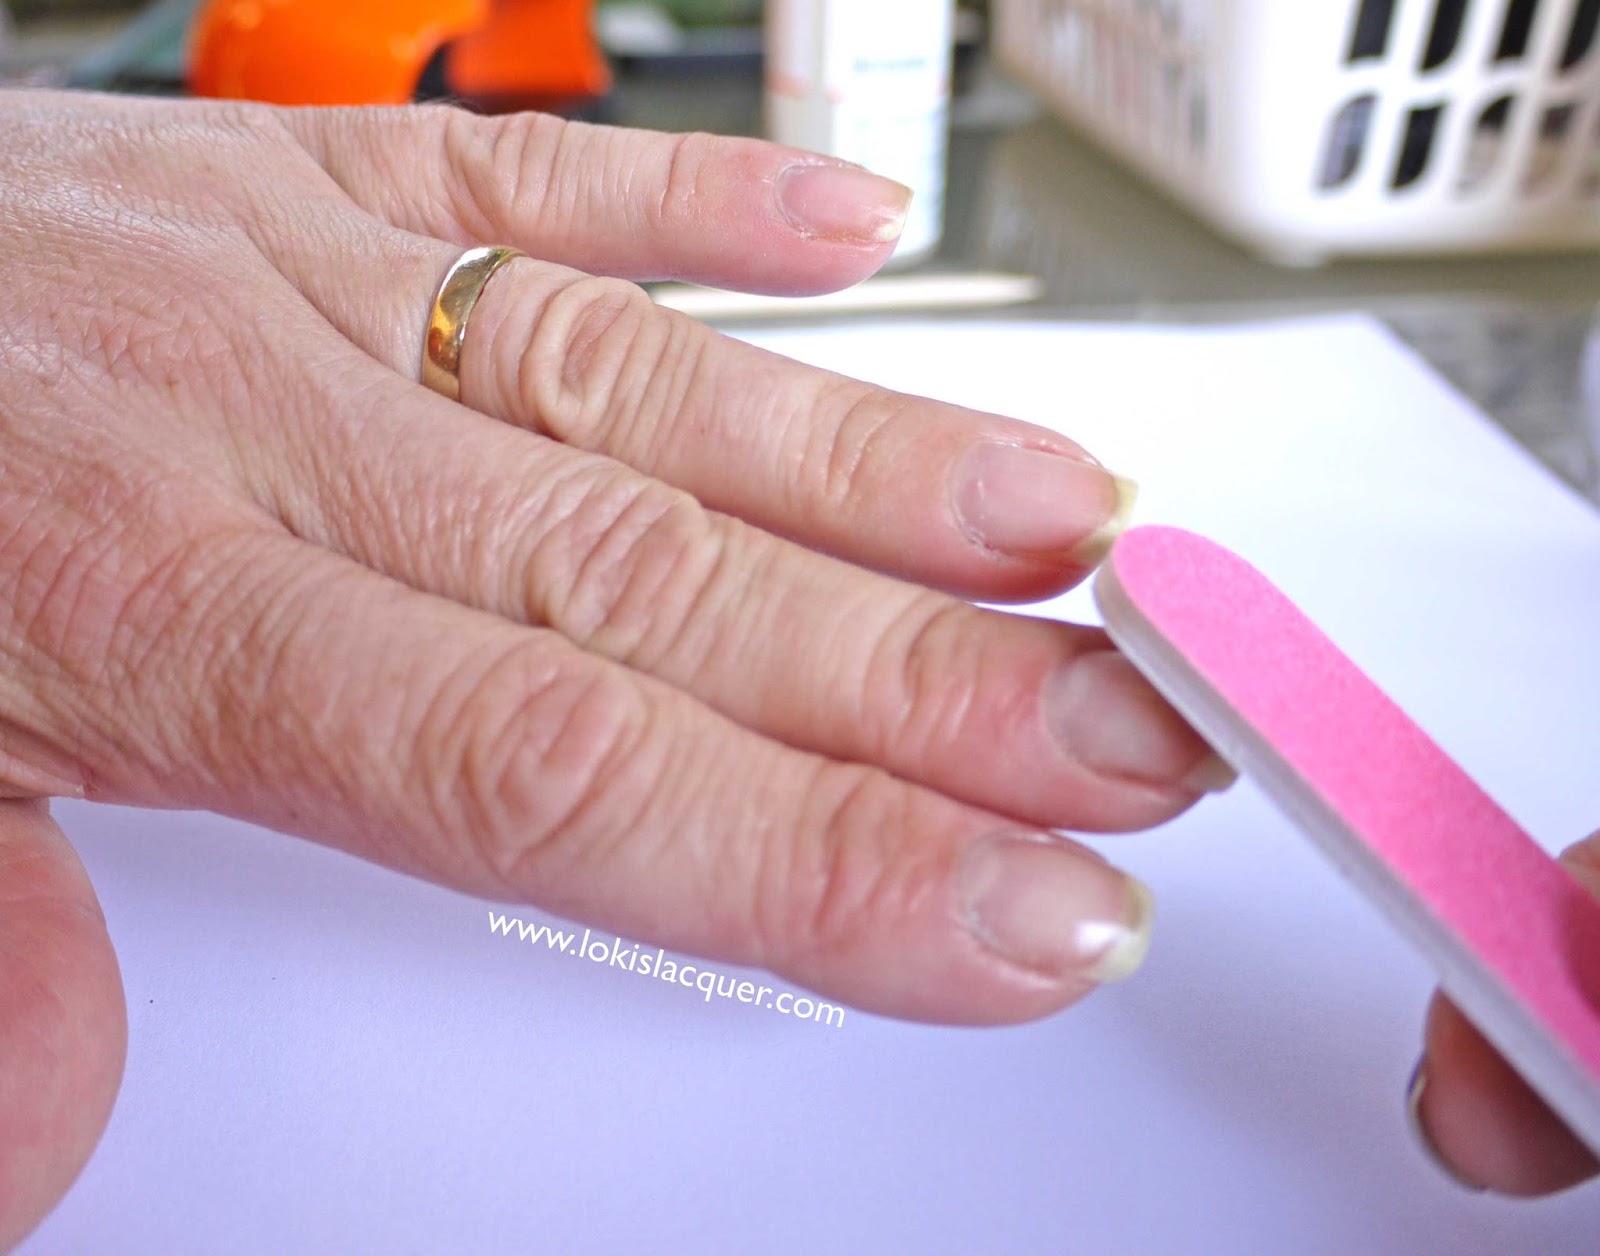
With the orange stick use the diagonal end (not the pointy end) and carefully push back the cuticle on each nail as seen below.

Step 2- Take the buffer and using the side that is grey ( not the pink side) and lightly buff your nails.
Step 3- Once you have buffed take a wipe (preferably lint free) and wipe your nails down with the Sally Hansen Acetone.

Step 4- Now your nails are prepped, you can start the gel manicure.
Take the Sally Hansen base coat, which is labeled step 1 on the bottle, and carefully paint a thin layer on your nails. When painting the gel on your nails DO NOT go all the way to the cuticle. leave a gap at least 2 mm. you do not want to flood your cuticles. This will make for a painful experience once cured. The other reason is with Gel manicures you need to create a "seal" so by leaving a gap, when you get to the top coat you can go slightly over the base and colour and "seal" them both in with the top coat.

Step 5- Place your 4 fingers under the Sally Hansen Salon manicure LED lamp and press the button. this is a timed lamp and will turn on for 30 secs which is the correct time to cure the Sally Hansen Salon Gel polish range. Once you have cured your 4 fingers, do the same to your thumb. Please....do not try to squeeze your thumb in with your 4 fingers. It is only 30 secs, getting your nails cured correctly will make the world of difference with the end result, so remember 4 fingers...then thumb.

Step 6- Once you have cured your nails now is the time to use the colour. The kit I have came with a colour called Wine not, so I will be using this colour, but Sally Hansen Salon Gel polish comes in a variety of colours that you can purchase separately.
Paint a thin layer of colour on your nails. Please make sure you do thin layers. with Gel polish ,more is not good. Gel polish likes to settle. It is a cured product and if you over paint your nails too thick, the polish will not cure in the 30 secs under the lamp. It can sometimes be hard to get out of the habit of painting that little bit thicker like you do with regular polish, but with Gel polish it needs to be kept thin. Curing is only 30 secs so it is quick and easy to build up the colour with thin coats to get a perfect finish.
When you paint the colour again, make sure you leave a 2 mm gap from your cuticles. we don't want flooded cuticles do we :)

Step 7- Once you have painted your nails with the coloured gel, cure your nails for 30 secs. (one press of the button) 4 fingers first, then the thumb separate.
Repeat step 6 and 7 until you get the desired thickness of Gel polish. For the colour I am using I only needed 2 coats to reach opacity.

Step 8- Once you have cured the coloured gel polish, and have the desired layers of colour, it is time for the top coat. The top coat bottle is labeled step 3, so it is easy to find in your kit. Again make sure you use a thin layer of the top coat and this time only leave a gap of 1mm from the cuticle. so basically you are sealing the colour in. also take your gel polish brush and carefully go over the tips of your nails. By painting a thin layer of gel over the ends/or tips of your nails you are totally sealing the polish in with the top coat, this helps stop chipping and gives your manicure a little more durablilty.

Step 9- Cure your top coat for 30 secs (one press of the button) 4 fingers first and the thumb separate.

Step 10- Take the wipes that are provided in the kit and wipe each nail to remove any sticky residue that is a by product of your gel manicure.

Step 11- Finally once you have wiped your nails, repeat steps 1-10 on your other hand. Then wash both hands in warm soapy water. I always do this to make sure all the residue is off my nails. I then put a little cuticle balm on my nails to moisturize. I have found that Sally Hansen Cuticle Massage cream is really moisturising.

The final result?? Wine not is a beautiful deep reddy colour with a slight shimmer. It took 2 coats for opacity. You can purchase this colour with the Gel kit or by itself.
 |
| In sun |
 |
| In shade |
I hope I have explained to you the basics of the Sally Hansen Salon Gel manicure kit If you have any questions please feel free to leave a message in the comments section and I will reply to you there :)
The kit is Exclusive at Priceline. You can grab it in store or online HERE. They retail for $99.95 but at the moment they are on special for $89.95. you can also pick up the gel polish separate in Priceline HERE each colour retails for $19.95 each. Priceline also stocks replacement cleanser pads for $11.00 and the acetone for $9.95.
Until next time.......

No comments:
Post a Comment
share the love!